......my favorite sweet combo.
Anna over at Cookie Madness always has yummy treats coming out of her oven, but these pb chocolate brownies really called out to me, especially when Anna pointed out that the peanut butter mixture does not use cream cheese. Don't get me wrong, I do like cream cheese swirled-brownies, but when it comes to peanut butter, especially when it's paired with chocolate, I want the peanut butter to be front and center. Cream cheese tends to dominate and tends to make things a tad too sweet.
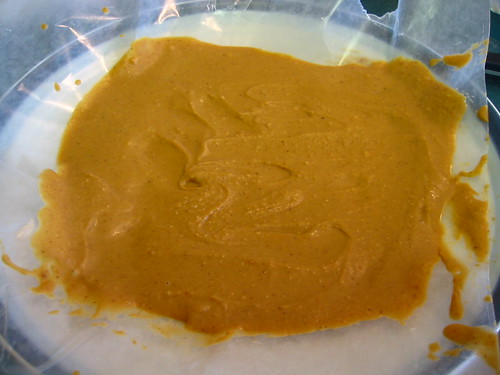
To make the ribbons, you melt together the peanut butter, peanut butter chips and butter and then spread it out on wax paper. As you can see, I was not all that neat about this part.
While the peanut butter mixture is chilling, you mix up the batter. Once the batter is ready, the pb mixture can be taken out of the fridge and cut into ribbons. Half the batter goes into the prepared pan and topped with half the pb ribbons. The remaining batter is gently spread over top and then the brownies go into the oven. After the brownies are finished baking and while they are still warm, the rest of the pb strips go on top. They are a bit more work than I am used to in a brownie, but worth every bit of it.
These brownies are delicious. In fact, DH immediately requested that I make them again. The brownies are moist and chocolaty and the peanut butter flavor in the ribbons really comes through. I used Smucker's Natural PB and though I haven't tried it with regular PB and therefore have nothing to compare it with, I have a feeling the natural PB kicks up the nutty flavor even more and I wouldn't try it any other way. The only thing I might change is to put all of the peanut butter inside the brownie - I wasn't all that fond of fussing with the peanut butter strips and trying to get them to look nice.
This recipe is definitely a keeper. We tried them out on a fairly large crowd and everyone raved about them.
Tuesday, April 29, 2008
Monday, April 28, 2008
Creating Pathways in the Garden
Yesterday was quite nice out and I had a trunk full of free mulch I had picked up in town, so DH and I seized the day and decided to create pathways between our lasagna beds.
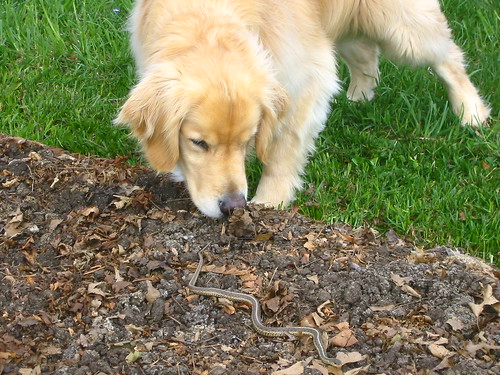
First, I pulled back the black weed barrier and found a surprise guest:
Bailey was curious, but cautious:
Bailey supervised as I got ready to mow the grass around the beds as short as possible:

Next, I laid down a layer of cardboard and soaked it with a hose. Note to self: Putting down cardboard goes much faster than using newspaper! Second note to self: Since it goes so fast, it couldn't possibly hurt to put down 2 layers next time.
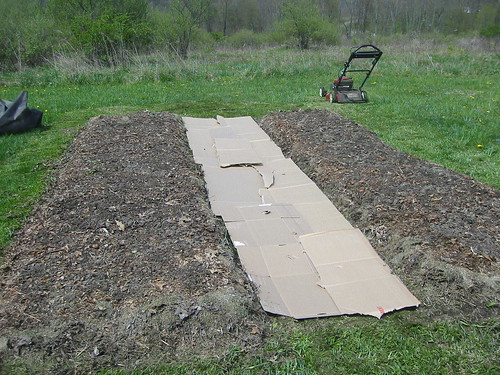
A thin layer of mulch goes down on both pathways. I kept the pathways fairly wide because originally I was thinking I would need to get a lawnmower in between the beds. I decided to keep them wide anyway since I'll still need to get the wheelbarrow between the rows and we certainly have plenty of space, so may as well give myself plenty of room to work.
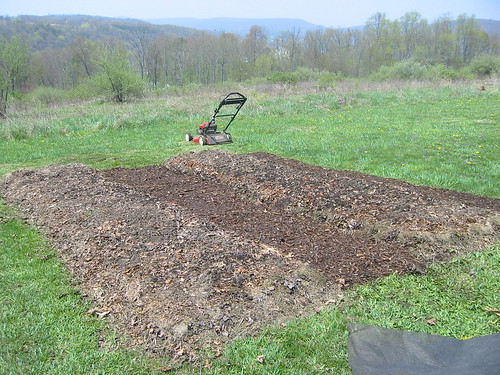
Almost as soon as the mulch went down, I decided that it was probably a mistake. The idea behind mulching the pathways was to cut down on having to mow and try to keep the grass from encroaching on the garden beds. However, the more I thought about the mulched areas around our yard, the more I thought about all the weeding I have to do in those mulched area. Mowing grass in a narrow pathway would go WAY faster than weeding. I'm starting to think that keeping grass between the pathways would actually be the lower-maintenance option.
Instead of immediately ripping it all out, I decided to leave it for now. We'll build 2 more beds this season and leave the grass in place - this way we can have it both ways and see which way ends up being less work. Having it both ways will certainly bother the anal part of me that likes things to be just so, but it will be a useful learning exercise, so I'll try my best to overlook it.
I dug a trench around the remaining borders of the beds to discourage the grass from trying to take over the beds:

Next project - hopefully to be completed next weekend as long as the weather holds out - a fence to keep out the bunnies. But so far this week is looking rainy and cold, so who knows when we'll get out there again............
First, I pulled back the black weed barrier and found a surprise guest:
Bailey was curious, but cautious:

Bailey supervised as I got ready to mow the grass around the beds as short as possible:

Next, I laid down a layer of cardboard and soaked it with a hose. Note to self: Putting down cardboard goes much faster than using newspaper! Second note to self: Since it goes so fast, it couldn't possibly hurt to put down 2 layers next time.

A thin layer of mulch goes down on both pathways. I kept the pathways fairly wide because originally I was thinking I would need to get a lawnmower in between the beds. I decided to keep them wide anyway since I'll still need to get the wheelbarrow between the rows and we certainly have plenty of space, so may as well give myself plenty of room to work.

Almost as soon as the mulch went down, I decided that it was probably a mistake. The idea behind mulching the pathways was to cut down on having to mow and try to keep the grass from encroaching on the garden beds. However, the more I thought about the mulched areas around our yard, the more I thought about all the weeding I have to do in those mulched area. Mowing grass in a narrow pathway would go WAY faster than weeding. I'm starting to think that keeping grass between the pathways would actually be the lower-maintenance option.
Instead of immediately ripping it all out, I decided to leave it for now. We'll build 2 more beds this season and leave the grass in place - this way we can have it both ways and see which way ends up being less work. Having it both ways will certainly bother the anal part of me that likes things to be just so, but it will be a useful learning exercise, so I'll try my best to overlook it.
I dug a trench around the remaining borders of the beds to discourage the grass from trying to take over the beds:

Next project - hopefully to be completed next weekend as long as the weather holds out - a fence to keep out the bunnies. But so far this week is looking rainy and cold, so who knows when we'll get out there again............
Sunday, April 27, 2008
Crazy for Cauliflower
I suppose to say that my family is CRAZY for cauliflower might be a bit of a stretch, but we certainly have been eating and enjoying a lot more of it over the last couple of years. For some reason, I tend to overlook this vegetable and I have no idea why. Partly it's because I get stuck in a rut when it comes to serving vegetable side dishes - I tend to grab the same things over and over, not really stopping to think about other possibilities. I think I also tend to dismiss cauliflower because it's such a bland color - I tend to reach for the more vibrant greens - but cauliflower is chock-full of important nutrients, so I need to reach for it more often.
My MIL made this dish during one of our visits and we all loved it. Shortly after that I made it at home and it did not come out well at all - the sauce was too runny. I finally decided to give it a try again recently and had much better success this time around. The key is to be patient and make sure the sauce really thickens up before baking it.
As usual, I did not use the reduced-fat cheese (no flavor!), but I did use skim milk which works quite well in this recipe. (I'm sure it would be better using the 1% the recipe calls for, but as I've said before, I try to cook with what I have on hand as much as possible.) I followed the rest of the recipe pretty much as written but instead of using white bread, I used sourdough. I keep bits and pieces of crusty sourdough leftovers in the freezer for making breadcrumbs - I like the texture and flavor better than using white sandwich bread, something I don't buy much of anyway.
The flavors in this dish are subtle - it's not going to bowl over your taste buds - but it's yummy and satisfying - healthy comfort food. We ate it as the main dish, but it would do nicely as a side dish too. Next time we make this, I plan to use whole wheat pasta.
Well, it's been fun getting back to blogging again, but it will probably be a few days before I get the chance again. My goal is to post at least once or twice a week until I'm off work for the summer and then hopefully I can get back to almost daily posting again. But for now, something is better than nothing..........
Saturday, April 26, 2008
Lasagna Gardening
NOTE: This post was started last fall. Rather than rewrite it, I'll just add to it........
Sadly, it's almost time to hang up the garden tools and begin hibernating until spring. On the one hand I'm looking forward to turning my attention indoors - there are many projects that need my attention - projects that have been neglected all summer long as I played outside. On the other hand, this was the first summer in a long time where I actually enjoyed doing yard work.
The weather was largely responsible for my change of heart - it was dry and sunny and not too hot most of the summer. Perfection. Another reason I enjoyed it was that I tried to approach things from a different angle. Instead of viewing the work as a list of chores that needed to be checked off, I tried to use the work as my excuse to get outside and enjoy the beautiful weather. I also worked with fewer time constraints. So what if I only have a 1/2 hour to put down mulch? The pile will still be there tomorrow and the next day. It will get done eventually. I have a lot more fun doing just about anything if I don't feel I have to finish it right this minute.
In keeping with my more relaxed approach, I am experimenting with a new-to-me way of gardening, Lasagna Gardening. Lasagna gardening is a method of gardening introduced by Patricia Lanza in her book by the same name. The aspect of this type of gardening that appeals to me most is that you build up instead of digging down. Instead of toiling for hours and hours digging out sod, tilling the soil, and then turning it over and working it every spring and fall, you build your garden up - no digging, no turning, no back-breaking labor. Well, there IS labor, but it's the kind of labor I don't mind so much. I don't know yet if I buy her "no weeding" claim yet, but we'll find out this spring and summer!
Fast forward to this spring..........
So where were we. Ah yes, building up rather than digging down. Not unlike the edible lasagna, lasagna garden beds are a series of layers. This is another appealing aspect of lasagna gardening because these layers are made up of things you can find around the yard or in your community. I try to use as many free things as possible, but there are still a few things I have to buy. (I haven't reached the point of fanatacism where I'm willing to visit farms and ask for - much less cart in the back of my car - free manure. But check back in a few years and see if I'm still holding out........)
As you can see from the pictures, we have opted to try open beds. Many folks build planting boxes to help contain the beds, but again, I'm going for minimum effort and expense, so we're trying open beds first. We can always build boxes later if open beds don't work out.
Once the newspaper or cardboard is down, you begin to build layers of organic material, mixing carbon-rich materials (brown) like leaves, with nitrogen-rich materials (green) like grass. (Check out this list for other sources of brown and green materials.) Part of the fun of this stage is trying to find as many free organic resources as possible.
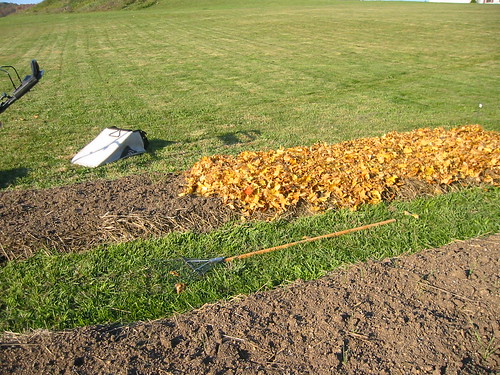
After the newspaper layer, we wanted to use something with a bit of weight to it (as opposed to leaves or straw) to help hold down the newspaper, so we went with peat moss. Peat moss is recommended in Pat Lanza's original book, but apparently she has backed off from using it because of questions of sustainability and because it really doesn't add much in the way of nutrients to the soil. It's also expensive and doesn't fit into my free and easy scheme, so I'm more than happy not to use it. (This year I plan to use free mulch instead.) Our next layer was a layer of straw (which I have to buy, but it's fairly cheap) followed by grass and then leaves. The grass and leaves are free and abundant although I have to scavenge the leaves.
Then I read a tip about using the mulched leaves that many towns pick up curbside. Many towns, mine included, have sites where they dump the leaves and other lawn waste and leave for residents to haul away for free. I have to admit that I get some rather strange looks when people see that I'm taking leaves OUT instead of bringing them IN since most people have more leaves than they know what to do with! But at least I didn't have to resort to having my son jump out of the car and pick up bags of leaves off the curb in front of other people's homes! He (13 years old) wasn't too keen on that idea. This has worked out great - not only to I have access to a LARGE supply of leaves, but in many cases they are already mulched. I just bring my gloves and some big black lawn bags and start stuffing.
The beds we have built are about 3 x 8. The idea is to make the beds easily accessible from all sides so that you never have to actually step IN the bed. This will help keep the soil from compacting, keeping the soil loose to promote root growth and making it easier to pull weeds.
Now supposedly you can build the beds and plant in them right away, but I liked the idea of having the beds ready to go once spring time came. I also figured that letting them sit over winter would help break down the layers a bit, hopefully creating a bit of worm-infested, rich soil in which to plant. I have stuck my hands in the layers and sure enough, I did find more dirt than was there before and worms too! Exciting!
Whew. That should do it for a first post about lasagna gardening. Our upcoming projects are to build a fence, create pathways between the gardens using cardboard and mulch (again, free from the city), create a proper compost area, and create at least 2 more beds. I will post as things progress and hopefully in a few months I will be taking pictures of our bounty! I'm definitely trying to enjoy the building process because I have control over this part. Once the plants go in, it's time to do battle with critters, pests, the elements - all the things that conspire to bring your garden down. But I'm determined to prevail this year.....the trick will be to do it without chemicals........
Here are a few articles on Lasagna Gardening:
Gardening in layers
Lasagna Gardening
Lasagna Gardening 101
Building Soil Nature's Way
Sadly, it's almost time to hang up the garden tools and begin hibernating until spring. On the one hand I'm looking forward to turning my attention indoors - there are many projects that need my attention - projects that have been neglected all summer long as I played outside. On the other hand, this was the first summer in a long time where I actually enjoyed doing yard work.
The weather was largely responsible for my change of heart - it was dry and sunny and not too hot most of the summer. Perfection. Another reason I enjoyed it was that I tried to approach things from a different angle. Instead of viewing the work as a list of chores that needed to be checked off, I tried to use the work as my excuse to get outside and enjoy the beautiful weather. I also worked with fewer time constraints. So what if I only have a 1/2 hour to put down mulch? The pile will still be there tomorrow and the next day. It will get done eventually. I have a lot more fun doing just about anything if I don't feel I have to finish it right this minute.
In keeping with my more relaxed approach, I am experimenting with a new-to-me way of gardening, Lasagna Gardening. Lasagna gardening is a method of gardening introduced by Patricia Lanza in her book by the same name. The aspect of this type of gardening that appeals to me most is that you build up instead of digging down. Instead of toiling for hours and hours digging out sod, tilling the soil, and then turning it over and working it every spring and fall, you build your garden up - no digging, no turning, no back-breaking labor. Well, there IS labor, but it's the kind of labor I don't mind so much. I don't know yet if I buy her "no weeding" claim yet, but we'll find out this spring and summer!
Fast forward to this spring..........
So where were we. Ah yes, building up rather than digging down. Not unlike the edible lasagna, lasagna garden beds are a series of layers. This is another appealing aspect of lasagna gardening because these layers are made up of things you can find around the yard or in your community. I try to use as many free things as possible, but there are still a few things I have to buy. (I haven't reached the point of fanatacism where I'm willing to visit farms and ask for - much less cart in the back of my car - free manure. But check back in a few years and see if I'm still holding out........)
First, a thick layer of wet newspaper.
The layers start off with wet newspaper or cardboard as a barrier against the grass and weeds. Our basement is currently overflowing with newspaper and cardboard in anticipation of creating several new beds this year as well as pathways between them. What a great way to recycle!As you can see from the pictures, we have opted to try open beds. Many folks build planting boxes to help contain the beds, but again, I'm going for minimum effort and expense, so we're trying open beds first. We can always build boxes later if open beds don't work out.
Once the newspaper or cardboard is down, you begin to build layers of organic material, mixing carbon-rich materials (brown) like leaves, with nitrogen-rich materials (green) like grass. (Check out this list for other sources of brown and green materials.) Part of the fun of this stage is trying to find as many free organic resources as possible.
After the newspaper layer, we wanted to use something with a bit of weight to it (as opposed to leaves or straw) to help hold down the newspaper, so we went with peat moss. Peat moss is recommended in Pat Lanza's original book, but apparently she has backed off from using it because of questions of sustainability and because it really doesn't add much in the way of nutrients to the soil. It's also expensive and doesn't fit into my free and easy scheme, so I'm more than happy not to use it. (This year I plan to use free mulch instead.) Our next layer was a layer of straw (which I have to buy, but it's fairly cheap) followed by grass and then leaves. The grass and leaves are free and abundant although I have to scavenge the leaves.
Here we've added straw, hummus/manure and we're
starting on the leaves. (The leaves really should be
chopped smaller than that for best results.)
With our 1+ acre of lawn, we have plenty of free grass. What we don't have is leaves - we live on converted farm land and the residents here haven not been good about planting trees, which is a shame. But I still get them for free! First I offered to rake my neighbors yard - a win-win - he gets out of some raking and I get free leaves. This worked okay, but was a lot of work - raking and then mowing the leaves and my mower really didn't break the leaves down enough and I could tell it wasn't going to give me enough leaves anyway.starting on the leaves. (The leaves really should be
chopped smaller than that for best results.)
Then I read a tip about using the mulched leaves that many towns pick up curbside. Many towns, mine included, have sites where they dump the leaves and other lawn waste and leave for residents to haul away for free. I have to admit that I get some rather strange looks when people see that I'm taking leaves OUT instead of bringing them IN since most people have more leaves than they know what to do with! But at least I didn't have to resort to having my son jump out of the car and pick up bags of leaves off the curb in front of other people's homes! He (13 years old) wasn't too keen on that idea. This has worked out great - not only to I have access to a LARGE supply of leaves, but in many cases they are already mulched. I just bring my gloves and some big black lawn bags and start stuffing.
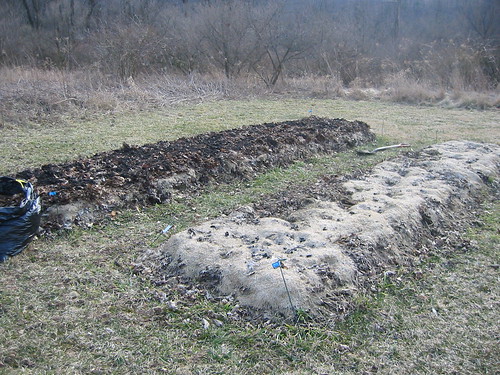
We built the beds about 18 inches high and then let them
sit all winter.
So anyway, we continued to alternate mostly leaves and grass but we also added composted manure/hummus (bought from Lowe's or Walmart) and a bit of straw. Straw doesn't break down all that easily, so I put it down toward the bottom thinking that maybe it would break down faster if it were underneath a lot of other material. We'll see. One drawback I've found with straw is that it tends to sprout, but the sprouts were easily weeded out. I've read that you can get sterile straw but apparently mine was not.sit all winter.
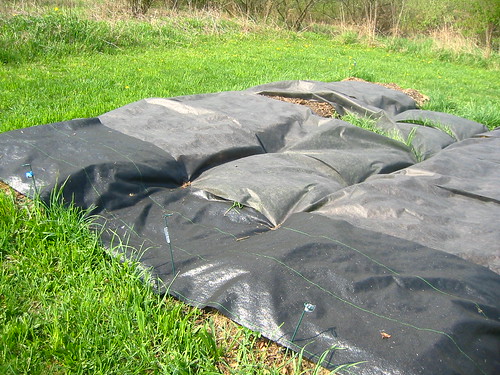
Earlier this spring I added another layer of leaves and some
hummus/manure and then covered the beds with black
weed barrier to let them "cook".
hummus/manure and then covered the beds with black
weed barrier to let them "cook".
Apparently some of the weed barrier I bought didn't work so well
because the grass underneath kept right on growing!
I've done a bit of reading and am trying to approach this in the most relaxed manner possible. At first I agonized over how much newspaper to use, how tall the beds should be, which organic materials to use and how much of each material and on and on. Now I've decided to just throw it on, see what happens and learn along the way. Again, my plan is to find out how little I can do and still have great results, so it makes sense to not agonize over exact proportions and to start out with a slightly shorter bed and see if that works before I decide that I must have a strict ratio (which makes it harder to build beds in certain seasons if you don't have access to certain things) or that the bed MUST be 24 inches high, etc.because the grass underneath kept right on growing!
The beds we have built are about 3 x 8. The idea is to make the beds easily accessible from all sides so that you never have to actually step IN the bed. This will help keep the soil from compacting, keeping the soil loose to promote root growth and making it easier to pull weeds.
Now supposedly you can build the beds and plant in them right away, but I liked the idea of having the beds ready to go once spring time came. I also figured that letting them sit over winter would help break down the layers a bit, hopefully creating a bit of worm-infested, rich soil in which to plant. I have stuck my hands in the layers and sure enough, I did find more dirt than was there before and worms too! Exciting!
Whew. That should do it for a first post about lasagna gardening. Our upcoming projects are to build a fence, create pathways between the gardens using cardboard and mulch (again, free from the city), create a proper compost area, and create at least 2 more beds. I will post as things progress and hopefully in a few months I will be taking pictures of our bounty! I'm definitely trying to enjoy the building process because I have control over this part. Once the plants go in, it's time to do battle with critters, pests, the elements - all the things that conspire to bring your garden down. But I'm determined to prevail this year.....the trick will be to do it without chemicals........
Here are a few articles on Lasagna Gardening:
Gardening in layers
Lasagna Gardening
Lasagna Gardening 101
Building Soil Nature's Way
Friday, April 25, 2008
Hello? Is anybody out there?
Oy. I only meant to take a few weeks off, but it turned into a couple of months! Life's been very busy and still is, but I'm going to try posting even just once a week to see if I can get back into the groove of things.
I've missed blogging, but on the upside, I have gotten a lot of things accomplished. I won't go into all the boring details, but one exciting thing I accomplished was painting all four bedrooms upstairs! Now that the weather is really nice, know I'll be very glad that I got it done over the winter so that I can focus my attention on the outdoors and the garden. Speaking of the garden, more on that in a later post.............
It's hard to figure out what my first post should be after being absent for so long! Since I left off last with a savory recipe, let's go sweet. I don't bake much these days. As much as I love to bake, it's just not good for the waistline, so I've cut back rather dramatically. It's not as much fun, but we're healthier for it.
If you like to bake and you like cookies, chances are you might be interested in this recipe. If not, you'll be bored by yet ANOTHER chocolate chip cookie recipe. Obviously I'm never bored or tired of them.....
This one was posted by a fellow blogger and member of the CLBB, Laura from The Spiced Life. Her raves about the flavor and texture of this cookie made me decide that it was definitely worth a try.
As I've probably mentioned here before, I'm a chocolate chip cookie snob - meaning I have a very definite idea of what I want out of a chocolate chip cookie and most cookies fall short of what I want. While these cookies are not quite as buttery as I like, I think the trade off for the texture is probably worth it - they are fabulously chewy -and chewiness ranks second right behind buttery flavor in what I look for in a chocolate chip cookie.
Unlike Laura, I usually like the taste of chocolate chip cookies BETTER the next day - the buttery flavor deepens as they sit - so that is not an issue for me. The use of peanut butter in the batter was intriguing. I also found it interesting that the batter only called for one stick of (per 2 cups of flour) - most of my favorite recipes call for two sticks.
I think I would dub these "Bill Yosses' Best of Both Worlds Chocolate Chip Cookies". They look and feel like a shortening cookie - if I saw this cookie on a plate somewhere, I probably would turn up my nose and pass it by because it really looks like a shortening-based cookie - it's thicker and it holds its shape well. But since they are made with butter, they don't have the boring flavor of a shortening cookie - you can taste the butter. They are not as deliciously buttery as a Toll House (one of the 2 sticks of better recipes), but like I said, the texture is so wonderful and they don't spread like so many do, I might be willing to give up the extra butter. The taste of a butter cookie with the texture of a shortening cookie - the best of both worlds. It is my theory that the peanut butter acts sort of like shortening but without actually giving it a peanut buttery flavor and certainly not the crumbliness I associate with an out-and-out peanut butter cookie.
With both batches, I used 1 teaspoon of vanilla, no vanilla beans and Smuckers Natural PB. The first batch I made I decided to use up some open bags of chips, so I used a half bag of peanut butter chips and a half bag of semisweet chips. I also chilled the batter for several hours because I was unable to bake them right away. I baked them for about 10 minutes. The cookies came out fine, but I didn't like all the chips. I'm one of those weird people who don't like many chips in my chocolate chip cookies - I want to taste the cookie part.
The second time I made them, I used one cup of Ghirardelli's bittersweet chocolate chips - my preferred chip for baking cookies. I baked them at 350 (my oven runs hot) for about 12 minutes WITHOUT chilling them. They came out even better. I think that chilling is definitely not necessary for these cookies and I actually think they had a better texture this time around (although the chips in the first batch may have contributed to that).
I forget exactly how many cookies I got - about 3 dozen (more the first time since there were 2 cups of chips).
Ahh, it feels good to post again. I hope someone is still out there checking on my neglected blog and that everyone hasn't given up on me entirely. Although I know I'd keep posting even if no one was reading, just because it's fun.
Subscribe to:
Comments (Atom)
